The Painted Pebbles Quilt (with tutorial!)
I had an idea for this bubbling in the back of my head whilst I was making my log cabin quilt and so I started in on it right after.
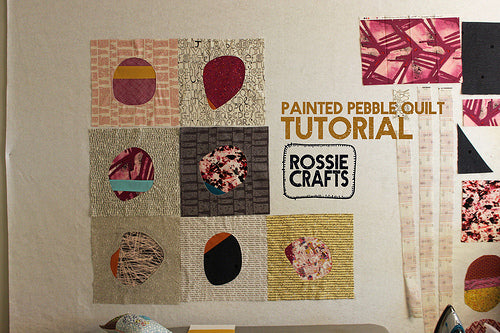
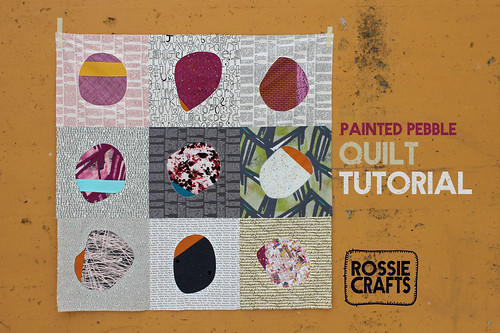
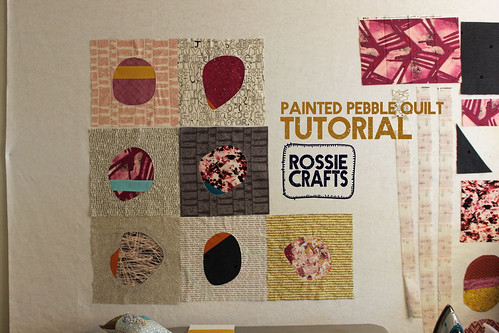 It's a Painted Pebble Quilt and it was pretty quick to make.
 This quilt is based on this lovely painting by Garima Dhawan of Garima Studio.
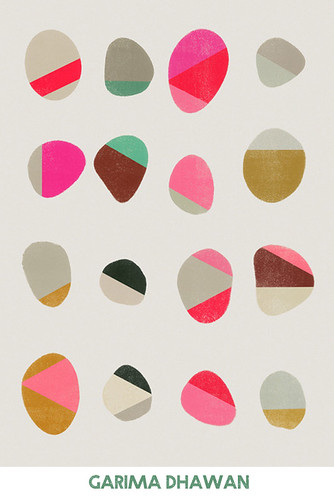 I first saw this painting on Pinterest without a name attached (damned orphan images!) I was really pleased to finally learn the name of the artist when it showed up over on the Creature Comforts blog. And then I found Garima over on Facebook, and asked if it would be okay with her if I shared my quilt on the blog and showed her painting and then posted a tutorial with a tip jar. She said go for it! Hooray!
I think what really needs explaining on this quilt is the process I used to get the pebbles into their blocks. I have no idea what the method I used should be called or if I invented it. I’ve tried googling around for appliqué methods and I haven’t found it presented elsewhere, but that might be because I just don’t know the proper name.
Anyway, I think my brain cooked this up from two things:
(1) Have you seen Lucie Summers’s Porthole Quilt? I don’t think she ever said how she made this or posted a tutorial, but I freakin’ love this quilt and have stared at the pictures enough to have my guesses on how it was made. I think I’m doing something very similar to what Lu did (but I’m guessing.)
I first saw this painting on Pinterest without a name attached (damned orphan images!) I was really pleased to finally learn the name of the artist when it showed up over on the Creature Comforts blog. And then I found Garima over on Facebook, and asked if it would be okay with her if I shared my quilt on the blog and showed her painting and then posted a tutorial with a tip jar. She said go for it! Hooray!
I think what really needs explaining on this quilt is the process I used to get the pebbles into their blocks. I have no idea what the method I used should be called or if I invented it. I’ve tried googling around for appliqué methods and I haven’t found it presented elsewhere, but that might be because I just don’t know the proper name.
Anyway, I think my brain cooked this up from two things:
(1) Have you seen Lucie Summers’s Porthole Quilt? I don’t think she ever said how she made this or posted a tutorial, but I freakin’ love this quilt and have stared at the pictures enough to have my guesses on how it was made. I think I’m doing something very similar to what Lu did (but I’m guessing.)
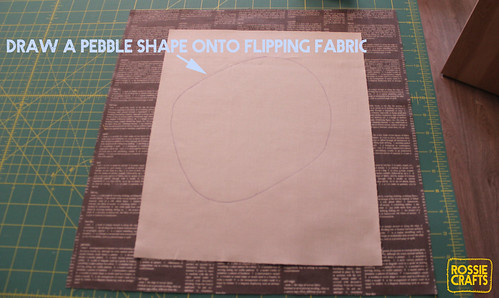
 b. Cut a 10-inch square (approximately) of a fabric (hereafter called the flipping fabric) that matches the main color in your background fabric (an even darker gray would be great!)
c. Trace a pebble shape onto the 10-inch square of fabric, being sure to leave at least an inch of fabric between the edge of the drawing and the edge of your fabric.
b. Cut a 10-inch square (approximately) of a fabric (hereafter called the flipping fabric) that matches the main color in your background fabric (an even darker gray would be great!)
c. Trace a pebble shape onto the 10-inch square of fabric, being sure to leave at least an inch of fabric between the edge of the drawing and the edge of your fabric.
 2. Assembling the background:
a. Place the 15.5-inch square right-side up on a work surface.
b. Place the 10-inch square of flipping fabric on top of it with the traced pebble shape showing.
c. Rotate the pebble to desired angle then use masking tape to adhere the edges of the flipping fabric to the background fabric using masking tape (I'm using a 1/2-inch wide tape).
2. Assembling the background:
a. Place the 15.5-inch square right-side up on a work surface.
b. Place the 10-inch square of flipping fabric on top of it with the traced pebble shape showing.
c. Rotate the pebble to desired angle then use masking tape to adhere the edges of the flipping fabric to the background fabric using masking tape (I'm using a 1/2-inch wide tape).
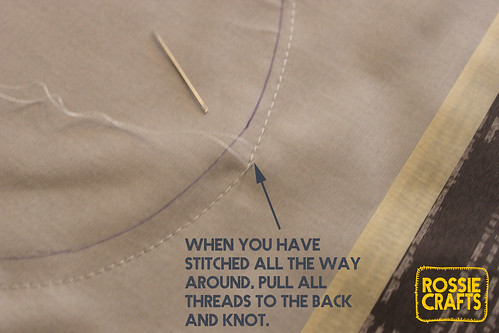
 d. Using a smallish straight-stich (a 2 or 3 for stitch length on most machines is advised), stitch ¼-inch around the edges of your traced line. Leave several inches of thread tails at the beginning. Go all the way around your pebble, keeping a smooth line. Do not worry too much if your stitching wanders a bit away from the line, so long as the line is smooth and you're reasonably close.
 e. When taking your block away from the machine, leave several inches of thread tails attached to your block.
f. Pull thread tails to the backside of the quilt block (either by lifting the last stitch on the back and pulling the small loop through or by threading a hand needle with the top thread and sewing it through to the back). Tie off the thread tails (knot them) and then snip them.
e. When taking your block away from the machine, leave several inches of thread tails attached to your block.
f. Pull thread tails to the backside of the quilt block (either by lifting the last stitch on the back and pulling the small loop through or by threading a hand needle with the top thread and sewing it through to the back). Tie off the thread tails (knot them) and then snip them.
 I use Aurifil Mako 50wt thread (Aurifil on the orange spool) for all of my piecing. This is a really strong, thin thread and so my knots and stitches hold tight and do not create any bulk or bumps in the patchwork.
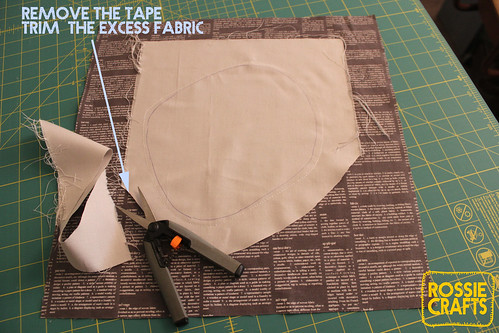
3. Flip that fabric!
a. Pull the tape off. If there's a lot of excess flipping fabric, trim it down. I like to leave an inch or two all the
way around.
I use Aurifil Mako 50wt thread (Aurifil on the orange spool) for all of my piecing. This is a really strong, thin thread and so my knots and stitches hold tight and do not create any bulk or bumps in the patchwork.
3. Flip that fabric!
a. Pull the tape off. If there's a lot of excess flipping fabric, trim it down. I like to leave an inch or two all the
way around.
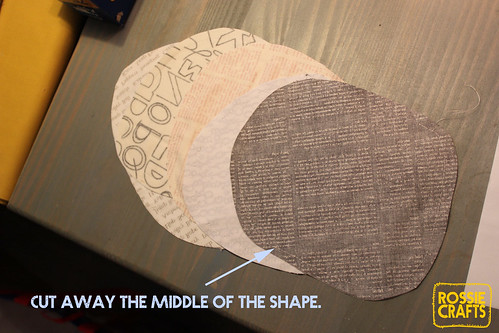
 b. Place the block on your rotary cutting mat and cut out the pebble shape in the middle. Cut about 1/2-inch inside your stitches. I do this with my 45mm rotary cutter; you may be more comfortable using scissors.
 Sidenote: I saved all my pebble shapes, rather than throwing them in the scrap bin. I’m going to use Jenna’s method to appliqué the pebbles onto another quilt! I stitched them together right after cutting them free.
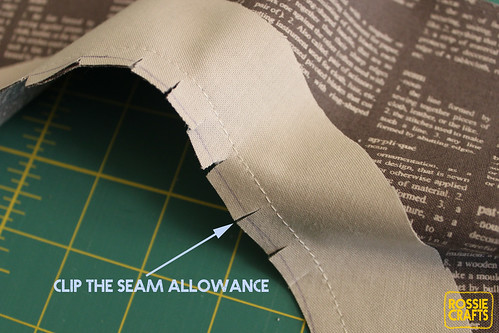
c. Clip the seam allowance, being careful not to cut all the way to your seam.
Sidenote: I saved all my pebble shapes, rather than throwing them in the scrap bin. I’m going to use Jenna’s method to appliqué the pebbles onto another quilt! I stitched them together right after cutting them free.
c. Clip the seam allowance, being careful not to cut all the way to your seam.
 d. Set your seams by pressing the block.
e. Begin flipping the flipping fabric by folding it into the open hole and around to the back. It's easiest to start with the straightest part of the pebble edge. Be patient with the fabric and move slowly. Use the iron to press as you go. You may find it useful to use a rolling motion with your fingers to get the seams in the correct position.
d. Set your seams by pressing the block.
e. Begin flipping the flipping fabric by folding it into the open hole and around to the back. It's easiest to start with the straightest part of the pebble edge. Be patient with the fabric and move slowly. Use the iron to press as you go. You may find it useful to use a rolling motion with your fingers to get the seams in the correct position.
 Once you've gone all the way around, your background is ready!
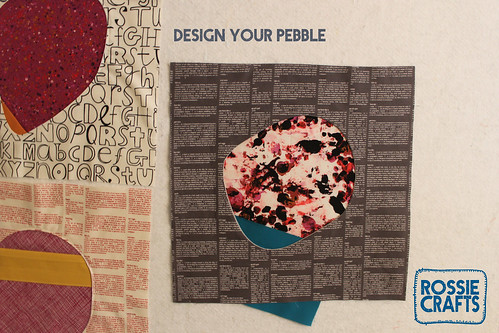
 4. Make your patchwork pebble.
Make your patchwork at least 1-inch bigger in all directions than the hole it is going to fill. I played around with a few variations on these pebbles and discovered that with these bright colors and the texty background prints, it worked best to keep the pebbles simple...one piece of bright fabric with a solid stripe across it (or a solid chunk in corner). I think fancier pebbles might work with simpler backgrounds.
4. Make your patchwork pebble.
Make your patchwork at least 1-inch bigger in all directions than the hole it is going to fill. I played around with a few variations on these pebbles and discovered that with these bright colors and the texty background prints, it worked best to keep the pebbles simple...one piece of bright fabric with a solid stripe across it (or a solid chunk in corner). I think fancier pebbles might work with simpler backgrounds.
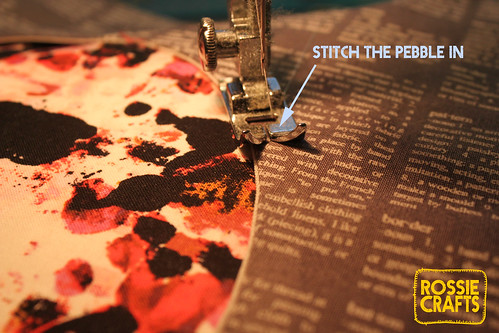
 5. Attach pebble to the background
a. To put the pebble in the hole, lay the prepared background fabric upside down on a work surface and then lay the pebble over the hole, making sure to cover the entire hole with at least 1/4-inch overlap on all sides.
5. Attach pebble to the background
a. To put the pebble in the hole, lay the prepared background fabric upside down on a work surface and then lay the pebble over the hole, making sure to cover the entire hole with at least 1/4-inch overlap on all sides.
 b.Tape down the edges of the pebble, making sure no tape is to close to the edges of the hole (at least 1/4-inch away from the edge.)
c. Place block right-side up on your machine and stich around the edge of the hole (about 1/8-inch looks great!) Leave several inches of thread tails at the beginning. Go all the way around your pebble, keeping a smooth line. When taking your block away from the machine, leave several inches of thread tails at the end.
b.Tape down the edges of the pebble, making sure no tape is to close to the edges of the hole (at least 1/4-inch away from the edge.)
c. Place block right-side up on your machine and stich around the edge of the hole (about 1/8-inch looks great!) Leave several inches of thread tails at the beginning. Go all the way around your pebble, keeping a smooth line. When taking your block away from the machine, leave several inches of thread tails at the end.
 d. Pull thread tails to the backside of the quilt block (either by lifting the last stitch on the back and pulling the small loop through or by threading a needle with the top thread and sewing them through to the back). Tie off the thread tails (knot them) and then snip them.
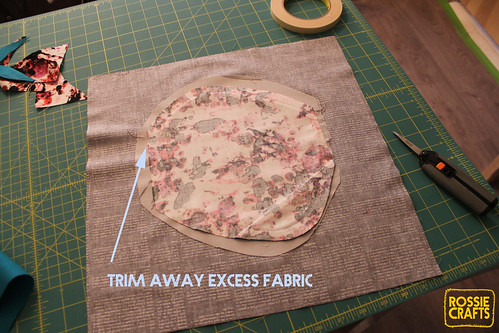
e. Trim excess fabric. Press block. Trim block down to 15x15."
d. Pull thread tails to the backside of the quilt block (either by lifting the last stitch on the back and pulling the small loop through or by threading a needle with the top thread and sewing them through to the back). Tie off the thread tails (knot them) and then snip them.
e. Trim excess fabric. Press block. Trim block down to 15x15."
 6. Fantastic! You're done! Nine pebbles in 15x15" backgrounds will make a 44x44-inch square quilt top (a baby quilt). Make more blocks for a larger quilt!
I'm already thinking of new color schemes for this quilt...what about mixed prints for the backgrounds and solids for the pebbles? Multiple sizes of blocks mixed together? There are so many possibilities!
6. Fantastic! You're done! Nine pebbles in 15x15" backgrounds will make a 44x44-inch square quilt top (a baby quilt). Make more blocks for a larger quilt!
I'm already thinking of new color schemes for this quilt...what about mixed prints for the backgrounds and solids for the pebbles? Multiple sizes of blocks mixed together? There are so many possibilities!


(photo by Lucie Summers, used with Lucie's permission)
(2) Jenna (of How to Be Jenna and The Ann Arbor Modern Quilt Guild) has done some really lovely appliqué on her recent projects and they are using a method she calls “sew-and-turn appliqué.” She just posted a tutorial on her method over on her blog (Sew-and-Turn Applique Tutorial) which you should check out! The applique method I’m about to describe is the reverse of Jenna’s method.
So, here it is: TUTORIAL TIME!
1. Preparing the Background:
a. Cut a 15.5-inch square of your background fabric (in this case a text fabric with a gray background).


 6. Fantastic! You're done! Nine pebbles in 15x15" backgrounds will make a 44x44-inch square quilt top (a baby quilt). Make more blocks for a larger quilt!
I'm already thinking of new color schemes for this quilt...what about mixed prints for the backgrounds and solids for the pebbles? Multiple sizes of blocks mixed together? There are so many possibilities!
6. Fantastic! You're done! Nine pebbles in 15x15" backgrounds will make a 44x44-inch square quilt top (a baby quilt). Make more blocks for a larger quilt!
I'm already thinking of new color schemes for this quilt...what about mixed prints for the backgrounds and solids for the pebbles? Multiple sizes of blocks mixed together? There are so many possibilities!